In the realm of construction, woodworking, or even simple DIY projects around the house, understanding the nuances of screw sizes is paramount. Whether you’re fixing a loose hinge, building a piece of furniture, or embarking on a larger construction project, selecting the right screw size can make all the difference.
In the United Kingdom, where both metric and imperial systems are used, this task can seem daunting at first. However, armed with the right knowledge and tools, measuring screw sizes becomes a straightforward process.
The good news is, measuring a screw size is a straightforward process, especially in the UK where the metric system reigns supreme. This guide will equip you with the knowledge and steps to confidently measure both the length and diameter of your screws, paving the way for smooth sailing on your next DIY adventure.
The Importance of Measuring Screw Size
Accurately measuring screw size is a fundamental step in any successful DIY project. It might seem like a minor detail, but using the wrong screw size can lead to a cascade of problems that can derail your project and compromise the final product. Here’s why measuring screw size is so important:
1. Ensures Proper Fit and Strength:
- Right Size, Right Grip: A screw that’s too small won’t have enough grip on the material you’re joining. It will struggle to hold the pieces together securely, potentially causing them to come loose or even break under stress. Conversely, a screw that’s too large can create an overly tight fit, potentially causing the material to crack or split.
- Material Matters: Different materials have varying densities and require screws with appropriate holding power. Measuring the screw size ensures you choose one with the necessary strength for the specific material you’re working with.
2. Prevents Damage to Materials:
- Oversized Screws: As mentioned earlier, using a screw that’s too large for the material can lead to cracking or splitting, especially in delicate materials like wood or thin plastic. This can ruin your project and necessitate replacement parts.
- Stripped Threads: Screwing in a screw that’s slightly too big can force the threads in the material to widen or become damaged. This can make it difficult to properly secure the screw, and future attempts to tighten or loosen it might result in stripped threads, rendering the whole connection useless.
3. Functionality and Aesthetics:
- Screw Head Depth: Screws come in various head styles, some designed to sit flush with the surface (countersunk) and others meant to protrude (flat head). Choosing a screw with the correct head type and size ensures it sits at the intended depth, creating a clean and professional finish. A screw that’s too long for a countersunk hole might stick out and look unsightly, while a screw that’s too short might leave a gap around the head.
4. Drilling Pilot Holes (Optional):
In some cases, depending on the material and screw size, drilling a pilot hole slightly smaller than the screw diameter is recommended. This helps to guide the screw and prevent the material from splitting. Accurately measuring the screw size allows you to drill a pilot hole of the appropriate size for a smooth and secure connection.
5. Finding Replacement Screws:
If you’re repairing an existing piece or replacing a missing screw, measuring the old screw is the most efficient way to find a perfect match. Knowing the exact size ensures you get a screw with the right length, diameter, and head type for a seamless replacement.
Measuring Screw Length (Step-by-Step with Images)
Now, let’s dive into the practical steps of measuring screw length. Here’s what you’ll need:
- A ruler or measuring tape with millimeter (mm) markings
- The screw you want to measure
1. Identify the Screw Head Type:
The first step is to identify the type of screw head you’re dealing with. Common types include:
- Flathead
- Countersunk
- Phillips’s head
- Robertson’s head
- Hex head
This is important because the starting point for measuring length can differ slightly depending on the head type.
2. Position the Screw:
For flat heads and most other screw heads (except countersunk), place the screw flat on a level surface.
3. Align the Ruler:
With the screw positioned, align the zero mark of your ruler or measuring tape with the underside of the screw head (where it would rest on the surface when screwed in).
4. Measure to the Tip:
Extend the ruler or tape measure along the length of the screw shaft, ensuring it reaches the very tip of the screw. The measurement in millimeters displayed at the tip is the screw length.
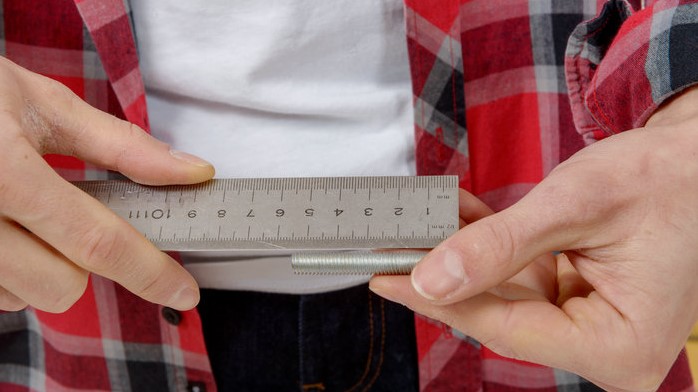
Image Source: oukailuo
Measuring Screw Diameter (Step-by-Step with Images)
Once you’ve mastered measuring screw length, let’s move on to determining the diameter. Here’s what you’ll need:
- A ruler or measuring tape with millimeter (mm) markings
- The screw you want to measure (optional: screw gauge for more accuracy)
1. Locate the Threads:
Identify the threaded portion of the screw shaft. These are the ridges that coil around the body of the screw.
2. Position the Screw:
Hold the screw vertically, with the threads facing you.
3. Measure the Width:
Using your ruler or measuring tape, carefully measure the distance across the widest part of the threads in millimeters. Ensure the measurement is taken perpendicular (at a 90-degree angle) to the threads for accuracy.
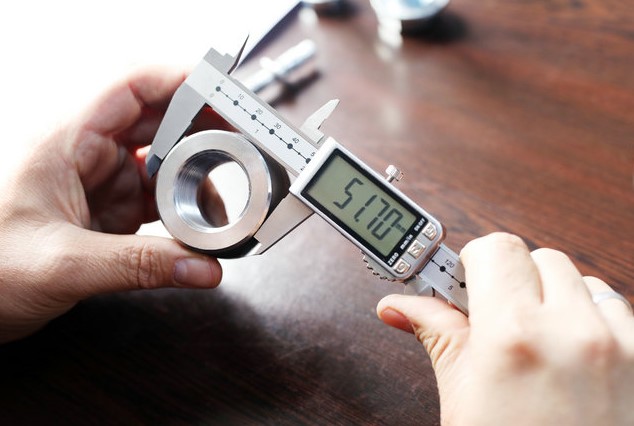
Image Source: oukailuo
Identifying Screw Head Types
Screws come in various head types, each designed for specific applications and installation methods. Common screw head types in the UK include flat head, pan head, round head, and countersunk head. The choice of screw head type depends on factors such as the material being fastened, aesthetic preferences, and tool compatibility.
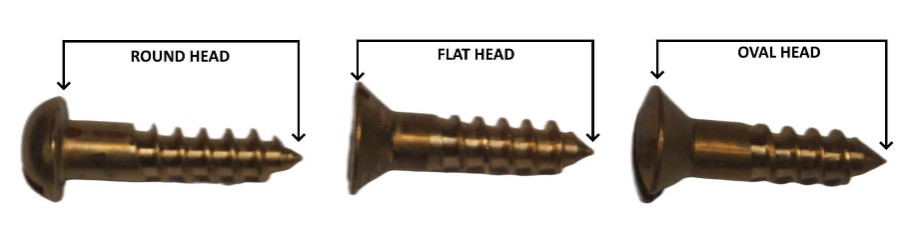
Image Source: fairwindfasteners
Flathead screws have a flat top surface and are often used for applications where the screw head needs to sit flush with the surface. Pan head screws have a rounded top surface and are suitable for applications where a more decorative or finished appearance is desired. Round head screws have a domed top surface and provide a more traditional look. Countersunk screws have a conical head shape that allows them to sit flush with the surface when installed, making them ideal for applications where appearance is critical.
Using Screw Size Charts and Guides
Screw size charts and guides are invaluable resources when selecting the right screw for a project. These charts provide detailed information on screw sizes, including diameter, length, and head type, making it easy to find the perfect match for your needs. When using a screw size chart, it’s essential to ensure that the measurements are consistent with the system you’re using (metric or imperial) to avoid confusion.
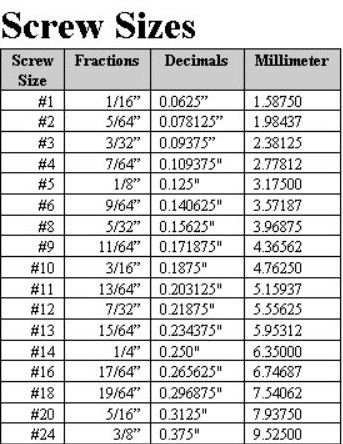
Image Source: bosunsupplies
Most hardware stores and online resources offer comprehensive screw size charts and guides that cater to both metric and imperial screw systems. These resources typically categorize screws by type, size, and application, making it easy to locate the desired screw quickly. When consulting a screw size chart, be sure to cross-reference the measurements with your own measurements to ensure accuracy.
Practical Applications and Examples
To illustrate the importance of accurate screw size measurement, let’s consider a few practical examples. Suppose you’re assembling a piece of furniture and need to attach two pieces of wood together using screws. Selecting screws with the correct length and diameter ensures a secure and stable connection between the two pieces of wood. Using screws that are too short may result in insufficient grip and instability, while screws that are too long may protrude through the wood or damage the surrounding material.
Similarly, in construction projects such as framing or drywall installation, using the correct screw size is crucial for structural integrity and safety. Using screws with the wrong diameter or thread pitch may compromise the strength of the structure and lead to instability or failure over time. By accurately measuring screw sizes and selecting the appropriate screws for each application, you can ensure the success and longevity of your projects.
Troubleshooting Common Issues
Despite your best efforts, you may encounter challenges when measuring screw sizes or selecting the right screws for a project. Common issues include inaccuracies in measurement, confusion between metric and imperial systems, and difficulty identifying screw types and sizes. Fortunately, there are several strategies you can employ to overcome these challenges.
If you’re having trouble measuring screw sizes accurately, double-check your measurements using a different method or tool to ensure consistency. If you’re unsure whether to use metric or imperial screws, consult the manufacturer’s specifications or seek advice from a knowledgeable professional. When in doubt, it’s always best to err on the side of caution and choose screws with slightly different sizes to accommodate variations in measurements.
Conclusion
Understanding how to measure screw sizes accurately is essential for successful DIY and construction projects in the UK. By familiarizing yourself with the key components of screws, mastering measurement techniques, and using resources such as screw size charts and guides, you can confidently select the right screws for any application. Remember to double-check your measurements.
Frequently Asked Questions (FAQs)
In the UK, screw sizes are typically indicated by their diameter and length. For example, a screw labeled “M5 x 25” means it has a 5mm diameter and a length of 25mm.
To determine the size of a screw, you’ll need to measure its diameter and length. Use a ruler or caliper to measure the diameter of the screw shaft and the length from the underside of the head to the tip.
Bolt sizes in the UK are measured similarly to screws, with the diameter and length being the key dimensions. Use a ruler or caliper to measure the diameter of the bolt shaft and the length from the underside of the head to the end of the bolt.
In terms of gauge, a 2.5mm screw falls into the range of around 12 to 14 gauge. However, it’s more commonly referred to by its metric diameter rather than its gauge.