A healthy toilet is essential for any home, and a key component in its proper function is the flush valve. This mechanism controls the release of water from the tank when you press the flush handle. Ensuring the correct size flush valve is crucial for efficient flushing and avoiding water waste.
This guide will walk you through measuring your flush valve size in the UK, providing two simple methods and some additional tips.
Importance of the Correct Flush Valve Size
Selecting the correct flush valve size is essential for maintaining optimal toilet performance. An improperly sized flush valve can lead to issues such as weak flushing, water wastage, or even toilet malfunctioning. In the UK, adhering to plumbing standards and regulations ensures that toilets operate efficiently and meet environmental and water conservation guidelines.
Tools Needed
Measuring Tape or Ruler
Precision is key when measuring flush valve size. A measuring tape or a ruler with millimeter markings will ensure accurate measurements.
Other Tools
- Screwdriver: Needed for removing screws that hold the flush valve in place.
- Notebook: Useful for recording measurements to avoid errors.
Step-by-Step Guide to Measuring Flush Valve Size
Preparation
- Turn Off the Water Supply: Locate the shut-off valve behind the toilet and turn it clockwise to stop the water flow.
- Empty the Toilet Tank: Flush the toilet to drain as much water as possible from the tank. Use a sponge or towel to soak up any remaining water.
Accessing the Flush Valve
- Remove the Tank Lid: Lift the lid off the tank carefully and set it aside. Be cautious as toilet tank lids are often made of fragile ceramic.
- Locate the Flush Valve: The flush valve is typically positioned in the center of the tank, connected to the overflow tube and flapper.
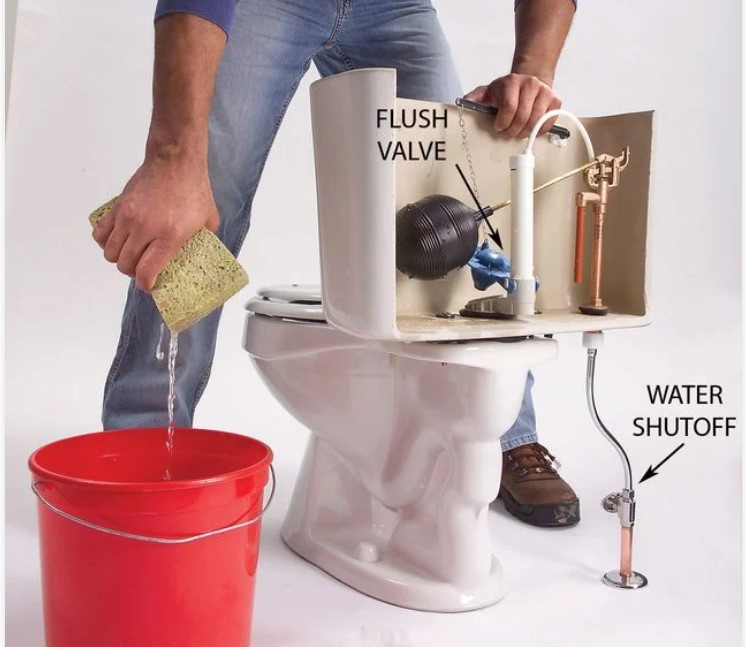
Image source: familyhandyman
Measuring the Flush Valve
- Measure the Diameter of the Flush Valve Opening:
- Use your measuring tape or ruler to measure the diameter of the flush valve opening from edge to edge. Make sure to measure at the widest point.
- Record this measurement in millimeters.
- Measure the Height of the Flush Valve:
- Measure the total height of the flush valve from the base to the top, including any sealing components.
- This is important for ensuring the new valve will fit correctly within the tank.
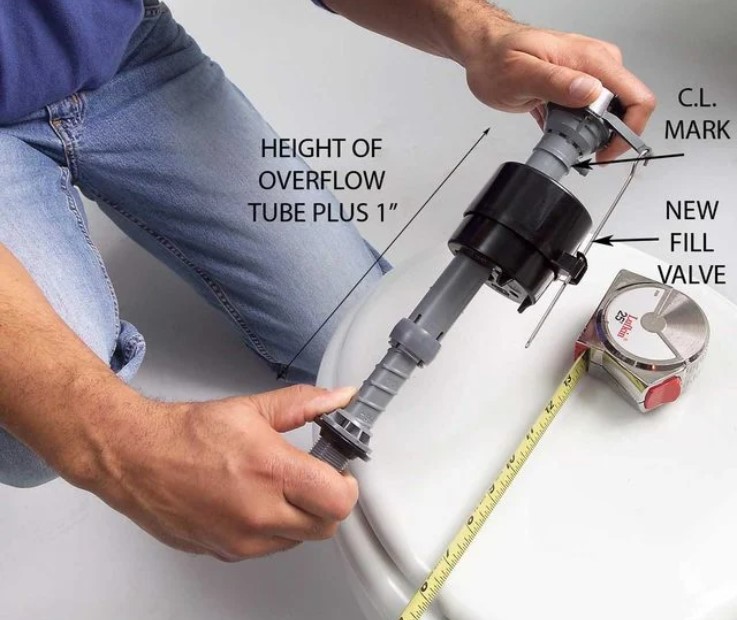
Image source: familyhandyman
Note the Distance Between the Flush Valve and Other Components:
- Measure the distance from the flush valve to other components in the tank, such as the fill valve and overflow tube, to ensure adequate space for operation.
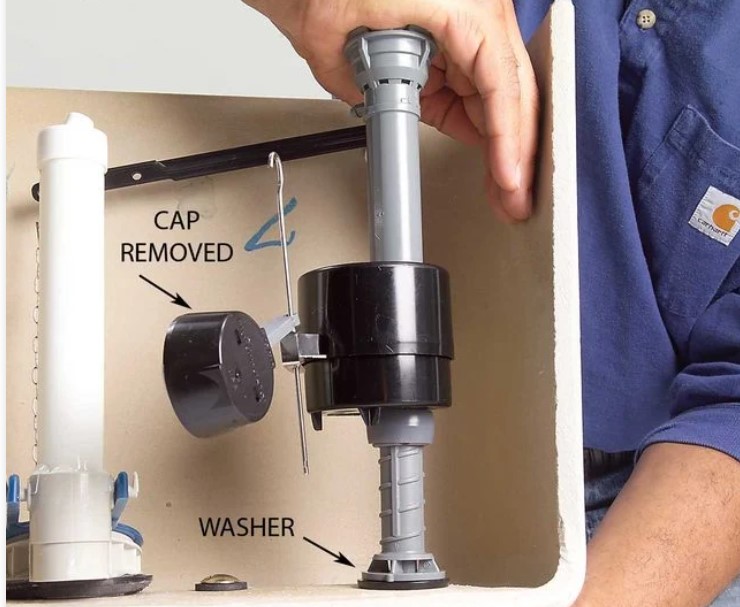
Image source: familyhandyman
Recording Measurements
Accurate recording of measurements is crucial. Write down all dimensions in millimeters, as this is the standard unit used in the UK plumbing industry. Double-check your measurements to avoid errors.
Common Flush Valve Sizes in the UK
Standard Sizes
In the UK, the most common flush valve sizes are 2 inches (approximately 50.8 mm) and 3 inches (approximately 76.2 mm). Some newer models may have larger flush valves for improved water flow and efficiency.
Compatibility
To determine if your measurements match standard sizes, compare your recorded measurements with the dimensions of standard flush valves available in the market. If your toilet has a non-standard size, you may need to contact the manufacturer for a suitable replacement.
Choosing the Right Flush Valve
Material and Quality
Flush valves are made from various materials, including plastic and metal. Plastic valves are typically more affordable and resistant to corrosion, while metal valves are more durable. When choosing a flush valve, consider the material and overall build quality to ensure longevity.
Brand Compatibility
It is crucial to match the flush valve to your toilet brand. Using a valve from a different manufacturer may result in improper fitting and performance issues. Many brands offer replacement parts specifically designed for their toilet models.
Eco-friendly Options
Low-flow flush valves are designed to use less water per flush, contributing to water conservation efforts. These eco-friendly options not only help save water but can also reduce your water bills. When selecting a flush valve, consider models that offer adjustable flush volumes or dual-flush mechanisms for added efficiency.
Installation Tips
Replacing the Flush Valve
- Remove the Old Flush Valve:
- Unscrew any retaining nuts or bolts holding the old flush valve in place.
- Carefully lift the old valve out of the tank, taking care not to damage any other components.
- Install the New Flush Valve:
- Position the new flush valve in the tank, ensuring it aligns with the overflow tube and other components.
- Secure the valve in place using the supplied nuts or bolts, and make sure it is tightly sealed to prevent leaks.
Ensuring a Proper Fit
- Check for Leaks:
- After installing the new flush valve, turn the water supply back on and fill the tank.
- Observe the valve and surrounding areas for any signs of leaks. If leaks are detected, tighten the connections or adjust the valve position.
- Adjusting the Flush Valve Height:
- Ensure the flush valve height is set correctly to allow for efficient flushing without water spilling over the overflow tube.
- Adjust the height if necessary, following the manufacturer’s instructions.
Troubleshooting Common Issues
Leaks
If leaks occur around the flush valve, it may indicate improper installation or a defective seal. Recheck the installation, ensuring all connections are tight and the seal is intact. If the problem persists, consider replacing the seal or the entire valve.
Flush Efficiency
Weak or incomplete flushes can result from several factors, including incorrect flush valve size, improper installation, or clogged ports. Ensure the flush valve is the correct size and properly installed. Clean any debris or mineral deposits from the valve and surrounding components to improve water flow.
Conclusion
Measuring the flush valve size accurately is essential for maintaining optimal toilet performance. Using the correct size ensures efficient flushing, water conservation, and compliance with UK plumbing standards. Following the step-by-step guide and considering the material, brand compatibility, and eco-friendly options, you can select and install the right flush valve for your needs.
Regular maintenance, such as checking for leaks and cleaning components, can extend the life of your flush valve and improve toilet performance. If you encounter persistent issues or are unsure about any step, consulting a professional plumber can provide expert assistance.
Frequently Asked Questions (FAQs)
To determine your flush valve size, measure the diameter of the flush valve opening at the bottom of the toilet tank. Most standard sizes are 2 inches or 3 inches. Use a ruler or measuring tape to get an accurate measurement.
Flush valve size refers to the diameter of the opening through which water flows from the toilet tank into the bowl. Common sizes include 2 inches and 3 inches, which affect the volume and speed of water released during flushing.
A 2-inch flush valve means the diameter of the opening is 2 inches. This size is standard in many toilets and provides a sufficient flow of water to flush waste efficiently.
The size of a WC (water closet) flush valve typically ranges between 2 inches and 3 inches. Measuring the diameter of the flush valve opening inside the toilet tank will help you identify the specific size needed for replacements or repairs.