Have you ever stared down a tape measure, feeling a pang of confusion? Don’t worry, you’re not alone! Reading a tape measure can seem daunting at first, especially in the UK where a combination of metric and imperial units might be present. But fear not, this guide will equip you with the knowledge and confidence to tackle any measuring task with ease.
In the realm of construction, carpentry, DIY projects, and even simple home repairs, one tool stands out as indispensable: the tape measure. This humble yet powerful tool is a cornerstone of accurate measurement, ensuring precision and efficiency in a wide array of tasks. Whether you’re a professional tradesperson or a casual hobbyist, knowing how to read a tape measure is an essential skill.
Definition and Importance of Reading a Tape Measure
At its core, a tape measure is a flexible ruler used to measure distance. However, its significance extends far beyond mere measurement. From determining the dimensions of a piece of furniture to laying out materials for a construction project, the tape measure plays a pivotal role in ensuring accuracy and precision. Without the ability to interpret its markings, users would struggle to execute tasks with the required level of detail and finesse.
Basic Components of a Tape Measure
Before delving into the intricacies of reading a tape measure, it’s essential to understand its basic components. A typical tape measure consists of three main parts: the blade, the hook, and the housing. The blade, marked with measurement increments, is the extendable metal strip that forms the body of the tape measure.
At one end of the blade is the hook, which facilitates secure anchoring when measuring from one edge of an object. The housing, usually made of plastic or metal, houses the blade and contains the mechanism for retracting it when not in use.
Understanding Tape Measure Units
Before diving into the markings, let’s acknowledge the importance of accurate measurement. Whether you’re tackling a DIY project, crafting a masterpiece, or simply hanging a picture frame, precise measurements ensure a perfect fit and a successful outcome.
Overview of Imperial Units in the UK
In the United Kingdom, tape measures commonly feature imperial units for measurement. These units include inches, feet, and yards, with subdivisions such as fractions and decimal inches. While the UK officially adopted the metric system in the 1960s, imperial units continue to be widely used, particularly in industries like construction and carpentry.
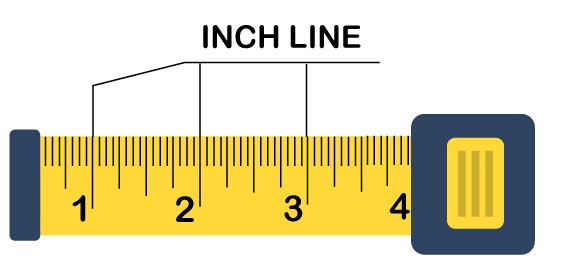
Image source: javatpoint
Explanation of Metric Units (for comparison)
Although imperial units dominate in the UK, familiarity with the metric system is advantageous, especially in an increasingly globalized world. Metric units, such as millimeters, centimeters, and meters, provide a standardized and straightforward method of measurement. Understanding both systems allows for seamless navigation between different measurement contexts.
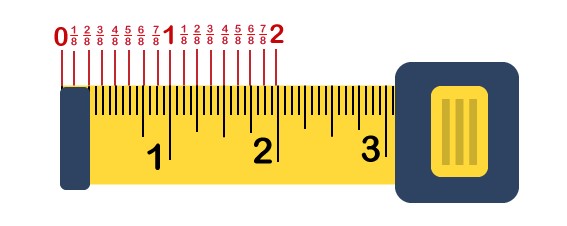
Image source: javatpoint
Importance of Knowing Both Systems
Proficiency in both imperial and metric units equips individuals with versatility and adaptability in various situations. Whether collaborating with international counterparts or working on projects that require specific unit preferences, the ability to switch between measurement systems is invaluable. Moreover, understanding the underlying principles of measurement transcends the specific units used, fostering a deeper comprehension of spatial relationships and dimensions.
Anatomy of a Tape Measure
Main Components
- Blade: The blade is a long, flexible strip of metal marked with measurement increments. It is typically housed within the tape measure casing and extends outwards for measuring.
- Hook: The hook is located at one end of the blade and is designed to securely anchor the tape measure when measuring from an edge. Its precise design ensures accurate measurements.
- Housing: The housing encases the blade when it is retracted and protects it from damage. It also contains the mechanism for smoothly extending and retracting the blade.
Markings and Graduations
- Whole Inches: The most prominent markings on a tape measure represent whole inches, denoted by numbers that increase sequentially along the blade.
- Fractions: In addition to whole inches, tape measures often feature markings indicating fractions of an inch, such as halves, quarters, eighths, sixteenths, and thirty-seconds.
- Decimal Inches: Some tape measures display decimal inches, providing a more precise measurement format. These measurements are expressed as decimals of an inch rather than fractions.
Different Types of Tape Measures
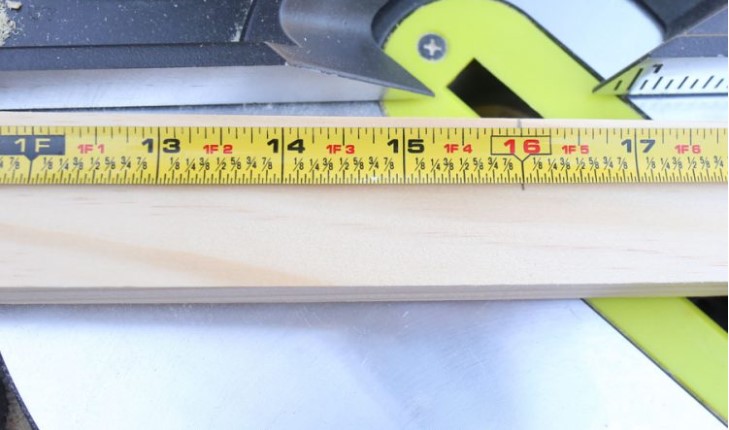
Image source: angelamariemade
- Standard Tape Measures: Standard tape measures feature a retractable blade housed within a plastic or metal casing. They are versatile and suitable for a wide range of applications.
- Long Tape Measures: Long tape measures, also known as surveyor’s tapes, are designed for measuring longer distances. They typically have a larger blade and a folding handle for ease of use.
- Measuring Tapes with Special Features: Certain tape measures come equipped with additional features, such as magnetic hooks, self-locking blades, and built-in levels, enhancing functionality and convenience.
Reading the Tape Measure
Understanding Whole Inches and Fractions
- Whole Inches: To read whole inches on a tape measure, locate the nearest inch marking to the end of the object being measured. The number corresponding to this marking indicates the number of whole inches.
- Fractions: In addition to whole inches, tape measures feature markings for fractions of an inch. These fractions are typically represented by lines of varying lengths, with each line denoting a specific fraction, such as halves, quarters, eighths, sixteenths, or thirty-seconds.
Reading Sixteenths and Thirty-Seconds
- Sixteenths: Sixteenth-inch markings are commonly found on tape measures and provide increased precision. To read sixteenths, locate the nearest inch marking and count the number of sixteenth-inch divisions beyond it.
- Thirty-Seconds: Some tape measures also include markings for thirty-second-inch divisions, offering even finer measurement increments. Similar to reading sixteenths, identify the nearest inch marking and count the number of thirty-second-inch divisions beyond it.
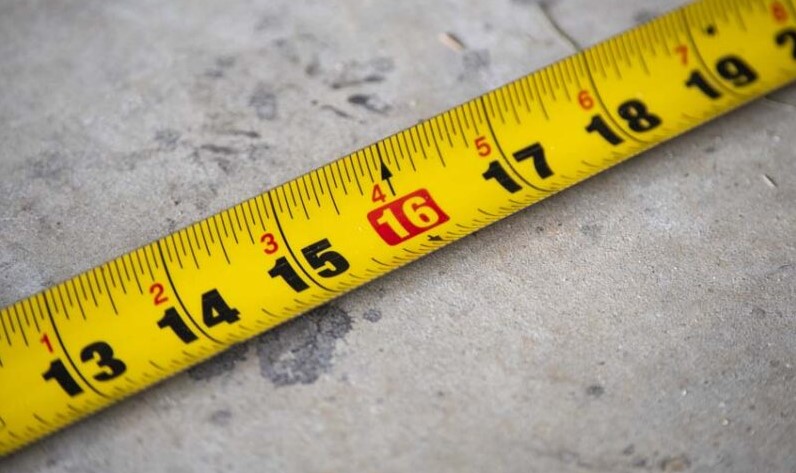
Image source: protoolreviews
Interpreting Metric Measurements
- Millimeters: Metric tape measures typically display measurements in millimeters, centimeters, or meters. To interpret metric measurements, locate the markings corresponding to the desired unit and read the measurement directly.
- Converting Between Units: When working with both imperial and metric measurements, it may be necessary to convert between units. Conversion factors facilitate seamless transitions between different measurement systems, ensuring accuracy and consistency.
Measuring Techniques
Proper Positioning of the Tape Measure
- Anchoring the Hook: When measuring from an edge or corner, ensure that the hook is securely anchored to prevent slippage and inaccuracies.
- Holding the Tape Measure: Hold the tape measure taut and level to obtain accurate measurements. Avoid bending or distorting the blade, as this can affect the precision of the measurement.
Taking Accurate Measurements
- Extending the Blade: Extend the blade of the tape measure to the desired length, ensuring that it remains straight and unwavering throughout the measurement process.
- Reading the Measurement: Carefully read the measurement markings on the blade, taking note of any whole inches, fractions, or decimal inches indicated.
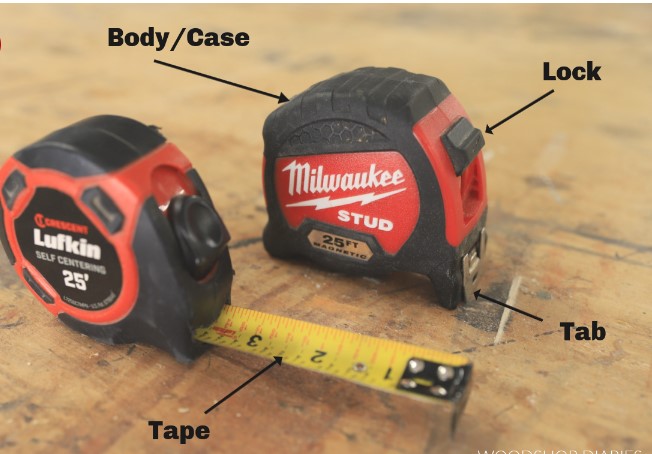
Image source: woodshopdiaries
Dealing with Odd Measurements and Angles
- Adding or Subtracting Measurements: When measuring irregularly shaped objects or distances, it may be necessary to add or subtract multiple measurements to obtain the total length accurately.
- Measuring Angles: In addition to linear measurements, tape measures can also be used to measure angles. By positioning the tape measure along the angle’s edge and reading the measurement markings, angles can be determined with relative accuracy.
Conclusion:
Finding the best espresso machine in the UK can elevate your coffee experience to new heights. With a myriad of options available, ranging from compact and budget-friendly models to high-end, feature-rich machines, there’s something to suit every taste and preference. By considering factors such as brewing capacity, ease of use, and customization options, you can narrow down your choices and invest in a machine that meets your needs perfectly.
Whether you’re a seasoned barista or a coffee enthusiast looking to indulge in café-quality beverages at home, the right espresso machine can transform your morning routine and unlock a world of rich, aromatic flavors. Explore our top picks and embark on your journey to espresso perfection today.
Frequently Asked Questions (FAQs)
To read a measuring tape, first, identify the starting point or edge of the object you’re measuring. Then, extend the tape measure along the length of the object, ensuring it’s taut and straight. Locate the nearest inch or centimeter marking to the end of the object. Note the number of whole inches or centimeters first, then count any additional markings for fractions or decimals. The final measurement is the combination of whole units and any fractions or decimals.
On a tape measure, centimeters (cm) are typically denoted by longer, numbered markings. These markings represent whole centimeters. Additionally, there may be shorter markings between the centimeter intervals, which represent millimeters (mm), allowing for more precise measurements.
The little lines on a tape measure, often located between the larger, numbered markings, represent fractions or decimal subdivisions of an inch or centimeter. These lines allow for more precise measurements. Depending on the tape measure, you may encounter lines indicating fractions such as halves, quarters, eighths, sixteenths, or thirty-seconds of an inch.
To read centimeters (cm) on a tape measure, locate the numbered markings indicating whole centimeters. For millimeters (mm), look for the smaller markings between the centimeter intervals. Each millimeter mark represents one millimeter. To obtain a measurement in centimeters and millimeters, first, note the whole centimeter value, then count the number of millimeters from the nearest centimeter mark.